This article shows you how you display the Excel data in an HTML table using SheetJS in Javascript. SheetJS is a javascript library used to work with various spreadsheet formats. In another article, we explained Converting Excel file data to JSON using the SheetJS library in Javascript. Today in this article, we will explain how to display Excel spreadsheet data in an HTML table using javascript.
Here first we convert the Excel data into JSON format then JSON data will be shown in HTML tabular format. Let’s see how it can be done.
Table of Contents
SheetJS Library
SheetJS is a powerful JavaScript library that enables developers to read, write, and display data from Excel spreadsheets directly in the browser. It supports various Excel file formats such as .xls, .xlsx, .xlsm, and .xlsb. With SheetJS, you can import Excel data, manipulate it, and then render it in an HTML table, making it easily accessible and visually appealing.
How to use SheetJS?
As it is a javascript library, we have to include it in the HTML document to use this library. There are various CDN links that can be used to include it. Let’s see one of the CDN links below:
| Library: | xlsx.min.js |
| CDN Link: | https://cdnjs.cloudflare.com/ajax/libs/xlsx/0.17.5/xlsx.min.js |
Now let’s see the below script that we have to include in the <head> tag of the HTML document,
<script src="https://cdnjs.cloudflare.com/ajax/libs/xlsx/0.17.5/xlsx.min.js"></script>
How to display Excel data in HTML Table using Javascript?
Follow the below steps to display Excel data in the HTML table:
- Define HTML
- Includes the SheetJS library
- Write the Javascript logic to upload and validate the Excel file
- Read the Excel data into JSON format
- Convert JSON data to the HTML table
1. Define HTML
First, we will define the HTML to allow users to upload an Excel file and display it in tabular format. We will define an HTML <input> tag with type=”file” to choose an Excel file. And a <button> tag to upload the file and an HTML <table> tag to display the data.
Let’s define the below HTML code in an HTML document file:
<h1>Upload an excel file to display in HTML Table</h1>
<!-- Input element to upload an excel file -->
<input type="file" id="file_upload" />
<button onclick="upload()">Upload</button>
<br><br>
<!-- table to display the excel data -->
<table id="display_excel_data"></table>
2. Includes the SheetJS library
Include the CDN link of library xlsx.min.js in the <head> tag of an HTML file as follows:
<head>
   <script src="https://cdnjs.cloudflare.com/ajax/libs/xlsx/0.17.5/xlsx.min.js"></script>
</head>
3. Write the Javascript logic to upload and validate the Excel file
We will define a javascript upload() method to upload and validate the Excel file. The upload() method will allow users to upload a valid Excel file only. Let’s see the below logic that we have to write in <script> tag:
// Method to upload a valid excel file
function upload() {
  var files = document.getElementById('file_upload').files;
  if(files.length==0){
    alert("Please choose any file...");
    return;
  }
  var filename = files[0].name;
  var extension = filename.substring(filename.lastIndexOf(".")).toUpperCase();
  if (extension == '.XLS' || extension == '.XLSX') {
      //Here calling another method to read excel file into json
      excelFileToJSON(files[0]);
  }else{
      alert("Please select a valid excel file.");
  }
}
4. Read Excel file in Javascript and convert it into JSON format
We have defined a javascript method excelFileToJSON() that will read the Excel file and convert the data into JSON format. Inside excelFileToJSON(), we have read the data of the Excel file by using a file reader as a binary string using readAsBinaryString() method. After that, we used XLSX which has a built-in facility to convert our binary string into a JSON object. And the XLSX.utils.sheet_to_json() method is used to read sheet data in JSON.
Let’s see the code below:
//Method to read excel file and convert it into JSON
function excelFileToJSON(file){
		  try {
			var reader = new FileReader();
			reader.readAsBinaryString(file);
			reader.onload = function(e) {

				var data = e.target.result;
				var workbook = XLSX.read(data, {
					type : 'binary'
				});
				var result = {};
				var firstSheetName = workbook.SheetNames[0];
                //reading only first sheet data
				var jsonData = XLSX.utils.sheet_to_json(workbook.Sheets[firstSheetName]);
				alert(JSON.stringify(jsonData));
				//displaying the json result into HTML table
				displayJsonToHtmlTable(jsonData);
				}
			}catch(e){
				console.error(e);
			}
}
5. Convert JSON data to the HTML Table using Javascript
Now we have defined a javascript method displayJsonToHtmlTable() to display the JSON data in an HTML table.
Let’s see the code:
//Method to display the data in HTML Table
function displayJsonToHtmlTable(jsonData){
		var table=document.getElementById("display_excel_data");
		if(jsonData.length>0){
			var htmlData='<tr><th>Student Name</th><th>Address</th><th>Email ID</th><th>Age</th></tr>';
			for(var i=0;i<jsonData.length;i++){
				var row=jsonData[i];
				htmlData+='<tr><td>'+row["Student Name"]+'</td><td>'+row["Address"]
				      +'</td><td>'+row["Email ID"]+'</td><td>'+row["Age"]+'</td></tr>';
			}
			table.innerHTML=htmlData;
		}else{
			table.innerHTML='There is no data in Excel';
		}
}
Display Excel data in HTML Table [complete example]
This example shows you Excel to HTML table Conversion. Let’s see the complete code below (putting all the above code in a single HTML file):
<!DOCTYPE html>
<html>
  <head>
    <meta name="viewport" content="width=device-width, initial-scale=1">
	<title>Excel to HTML Table | Javacodepoint</title>
    <script src="https://cdnjs.cloudflare.com/ajax/libs/xlsx/0.17.5/xlsx.min.js"></script>
  </head>
  <body>
  	<h1>Upload an excel file to display in HTML Table</h1>
	<!-- Input element to upload an excel file -->
    <input type="file" id="file_upload" />
    <button onclick="upload()">Upload</button>
    <br>
    <br>
	<!-- table to display the excel data -->
	<table id="display_excel_data" border="1"></table>
    <script>

      // Method to upload a valid excel file
	  function upload() {
		var files = document.getElementById('file_upload').files;
		if(files.length==0){
		  alert("Please choose any file...");
		  return;
		}
		var filename = files[0].name;
		var extension = filename.substring(filename.lastIndexOf(".")).toUpperCase();
		if (extension == '.XLS' || extension == '.XLSX') {
			//Here calling another method to read excel file into json
			excelFileToJSON(files[0]);
		}else{
			alert("Please select a valid excel file.");
		}
	  }

	  //Method to read excel file and convert it into JSON
	  function excelFileToJSON(file){
		  try {
			var reader = new FileReader();
			reader.readAsBinaryString(file);
			reader.onload = function(e) {

				var data = e.target.result;
				var workbook = XLSX.read(data, {
					type : 'binary'
				});
				var result = {};
				var firstSheetName = workbook.SheetNames[0];
				//reading only first sheet data
				var jsonData = XLSX.utils.sheet_to_json(workbook.Sheets[firstSheetName]);
				//displaying the json result into HTML table
				displayJsonToHtmlTable(jsonData);
				}
			}catch(e){
				console.error(e);
			}
	  }

	  //Method to display the data in HTML Table
	  function displayJsonToHtmlTable(jsonData){
		var table=document.getElementById("display_excel_data");
		if(jsonData.length>0){
			var htmlData='<tr><th>Student Name</th><th>Address</th><th>Email ID</th><th>Age</th></tr>';
			for(var i=0;i<jsonData.length;i++){
				var row=jsonData[i];
				htmlData+='<tr><td>'+row["Student Name"]+'</td><td>'+row["Address"]
				      +'</td><td>'+row["Email ID"]+'</td><td>'+row["Age"]+'</td></tr>';
			}
			table.innerHTML=htmlData;
		}else{
			table.innerHTML='There is no data in Excel';
		}
	  }
    </script>
  </body>
</html>
Test and Live Demo
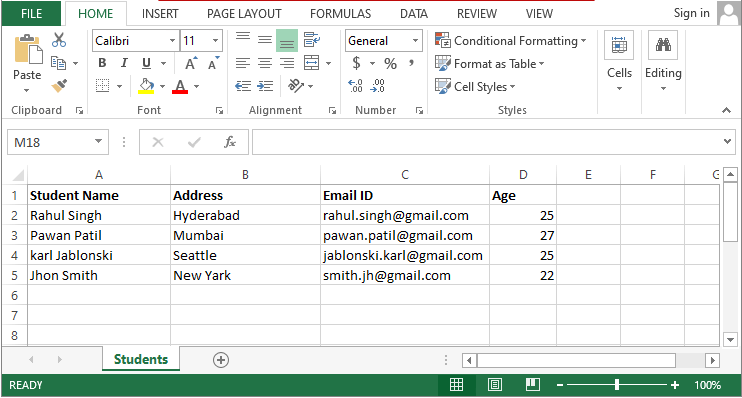
Let’s assume a sample Excel file(students.xlsx) that we are going to upload. As you can see in the below image this Excel file contains the student’s data(name, address, email id, and age).

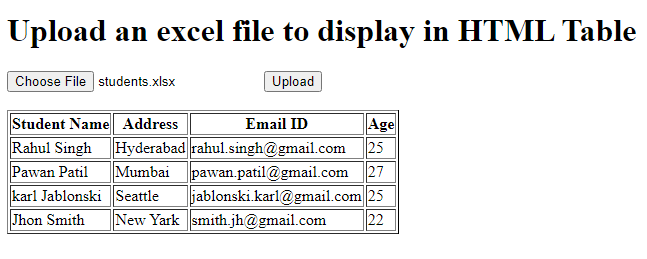
Let’s see the result once we upload the above Excel file to this application.

Conclusion
In this tutorial, you have seen how you display the Excel file data in an HTML Table using Javascript. You have seen here, that can be easily done by using the SheetJS library. As you have seen this library has the capability to convert binary strings to JSON format that is used here to display in an HTML table.
Related articles:
- Convert JSON data into HTML table using jquery
- Convert Excel file data to JSON in Javascript
- How to read Excel files in Java using Apache POI?
- How to create password-protected Excel in Java?
- How to write data to an existing Excel file in Java?

These are truly enormous ideas in regarding blogging.
You have touched some nice factors here. Any way keep up wrinting.
I’ve been exploring for a little bit for any high quality articles or weblog posts
on this sort of space . Exploring in Yahoo I eventually stumbled upon this site.
Studying this information So i am satisfied to express that I’ve an incredibly good uncanny feeling I found out exactly what I needed.
I such a lot surely will make sure to don?t fail to remember this website and give it a glance on a relentless basis.
this works perfectly but i wanna know if there’s a chance of adding two excel files into the html page just with the same method but instead of one excel sheet i need to add two
Please I am having problems uploading my excel file how do you upload yours
Firstly, thanks to the amazing script, it eases my life significantly. I just have one concern, the script is picking up the function of the cell as undefined, is there any method that can skip the cells that has an excel function in the cells?
Really looking forward to having another problem-solving mechanism.
Thanks!