This article delves into a comprehensive step-by-step guide and educates how to seamlessly do the Java Jackson setup into a Maven Application within the Eclipse IDE environment. By following this guide, you can harness the power of Jackson’s JSON data serialization and deserialization capabilities.
Table of Contents
1. Introduction to Java Jackson JSON library
Jackson is a popular Java library used for processing and manipulating JSON (JavaScript Object Notation) data. JSON is a lightweight data interchange format that is easy for both humans to read and write, and for machines to parse and generate. It’s commonly used to represent structured data, such as configuration settings, API responses, etc.
Jackson provides tools and classes that allow Java developers to work with JSON data seamlessly. It primarily revolves around two main concepts:
- JSON Serialization: This involves converting Java objects into their JSON representation. Jackson helps you transform Java objects into valid JSON strings, making it easy to send data to external systems or APIs in a compatible format.
- JSON Deserialization: This is converting JSON data back into Java objects. Jackson assists in parsing JSON strings and creating corresponding Java objects, enabling you to work with the data in your Java application.
2. Java Jackson Setup – Prerequisites
The below-listed software should be installed on your system.
- Java JDK Installation steps
- Eclipse IDE Download link
3. Setting up a Maven Project in Eclipse IDE
- Open Eclipse IDE.
- Click on “File” > “New” > “Other…”.
- Select “Maven” > “Maven Project” and click “Next”.
- Choose “Create a simple project (skip archetype selection)” and click “Next”.
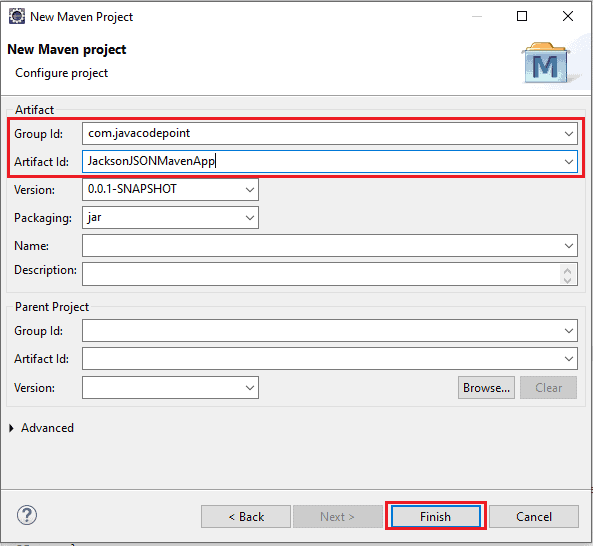
- Enter the Group Id and Artifact Id, then click “Finish” to create the Maven project.

4. Adding Java Jackson Dependency
In your Maven project, open the pom.xml file. Inside the <dependencies> section, add the following dependency for Jackson:
<dependency>
    <groupId>com.fasterxml.jackson.core</groupId>
    <artifactId>jackson-databind</artifactId>
    <version>2.15.2</version>
</dependency>
Note: Maven dependency “jackson-databind” uses the “jackson-core” and “jackson-annotations” internally so you don’t need to add them separately. Adding only “jackson-databind” dependency is enough.
Now, save the pom.xml file. Maven will automatically download the Jackson library.
5. Creating a Sample Java Class
- Create a new Java class in the
src/main/javadirectory of your Maven project. - Define a sample Java class with attributes and getters/setters for serialization and deserialization examples.
Serialization and Deserialization Examples
Let’s assume you have the following Employee class:
import com.fasterxml.jackson.annotation.JsonProperty;

public class Employee {
    @JsonProperty("id")
    private int id;

    @JsonProperty("first_name")
    private String firstName;

    @JsonProperty("last_name")
    private String lastName;

    // Constructors, getters, setters
}
Serialization Example:
Serialization involves converting a Java object into its JSON representation. Here’s how you can serialize an Employee object using Jackson:
import com.fasterxml.jackson.databind.ObjectMapper;

public class SerializationExample {
    public static void main(String[] args) throws Exception {
        ObjectMapper objectMapper = new ObjectMapper();

        Employee employee = new Employee();
        employee.setId(1);
        employee.setFirstName("John");
        employee.setLastName("Doe");

        String json = objectMapper.writeValueAsString(employee);
        System.out.println(json);
    }
}
OUTPUT:
{“id”:1,”first_name”:”John”,”last_name”:”Doe”}
Deserialization Example:
Deserialization involves converting JSON data back into a Java object. Here’s how you can deserialize a JSON string into an Employee object using Jackson:
import com.fasterxml.jackson.databind.ObjectMapper;

public class DeserializationExample {
    public static void main(String[] args) throws Exception {
        ObjectMapper objectMapper = new ObjectMapper();

        String json = "{\"id\":1,\"first_name\":\"John\",\"last_name\":\"Doe\"}";
        Employee employee = objectMapper.readValue(json, Employee.class);

        System.out.println("Employee ID: " + employee.getId());
        System.out.println("First Name: " + employee.getFirstName());
        System.out.println("Last Name: " + employee.getLastName());
    }
}
OUTPUT:
Employee ID: 1
First Name: John
Last Name: Doe
In these examples, we use the ObjectMapper class from the Jackson Library. For serialization, the writeValueAsString() method is used to convert a Java object into a JSON string. For deserialization, the readValue() method is used to convert a JSON string back into a Java object of the specified class. The @JsonProperty annotations are used to specify the mapping between Java class fields and JSON property names.
6. Conclusion
In this article, we walked through the step-by-step process of setting up the Java Jackson JSON library environment within an Eclipse IDE using a Maven Application. We covered the basics of adding the Jackson dependency, creating a sample Java class, and demonstrated serialization and deserialization examples. By following this guide, you can effectively incorporate the Jackson library into your Java projects, making JSON data manipulation seamless and efficient.
If you want to do the Jackson JSON environment setup for a Standalone Java Application, then visit: Jackson JSON Setup for a Standalone Java Application.
