The multiple file upload with the progress bar in the web application gives the best user experience to the end-user. This article shows you how to upload files in the Spring Boot web application with an advanced progress bar to achieve the best user experience.
Let’s have a look at the image below, this is what you can build at the end of this article.
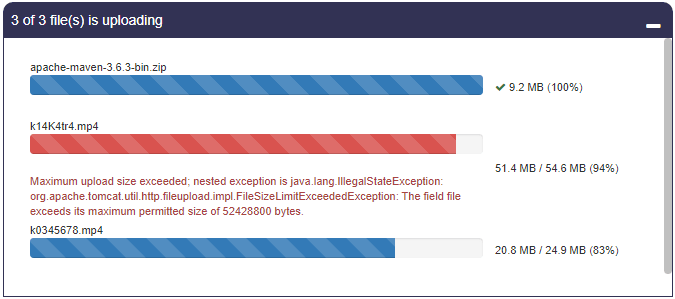
Table of Contents
Software Dependency
- Spring Tools 3.9.14.RELEASE (Eclipse plug-in) ( installation steps )
- JDK 1.8 ( installation steps )
- Maven 3.6.3 ( installation steps )
- Tomcat Server-Embedded
- Eclipse IDE 2020-06 ( Download )
We hope the above software dependencies are already available in your system if not follow the specified installation steps to set up your spring boot application environment.
Create Spring Boot File Upload Application
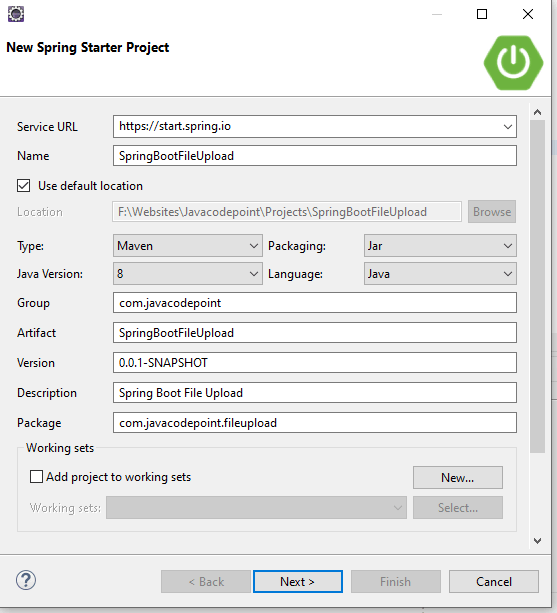
Let’s open Eclipse IDE, click on File > New > Spring Starter Project then provide the below details as you can see in the image.
Name: SpringBootFileUpload, Group: com.javacodepoint, Artifact: SpringBootFileUpload, Package: com.javacodepoint.fileupload
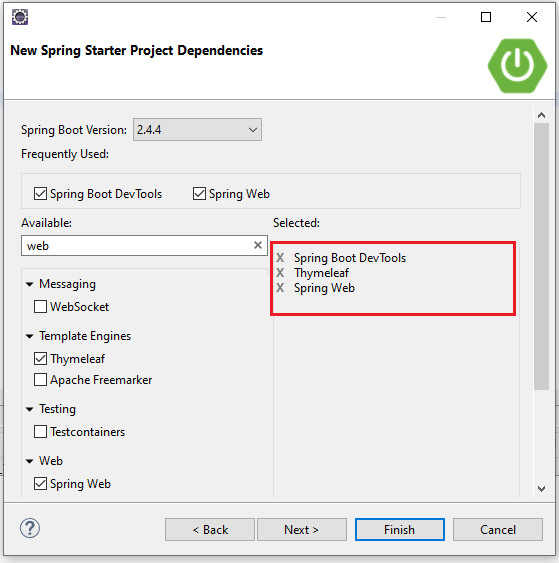
Select the required Spring Starter Dependency
- spring-boot-starter-web (Spring Web)
- spring-boot-starter-thymeleaf (Thymeleaf)
- spring-boot-devtools (Spring Boot DevTools)
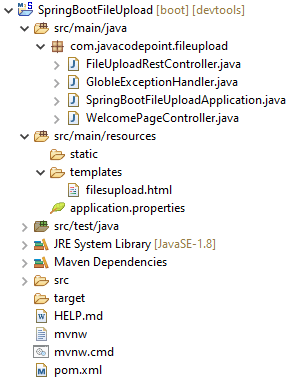
Spring Boot File Upload Ajax Project Structure
Spring boot Maven eclipse project structure will look like the below image:
pom.xml
<?xml version="1.0" encoding="UTF-8"?>
<project xmlns="http://maven.apache.org/POM/4.0.0"
	xmlns:xsi="http://www.w3.org/2001/XMLSchema-instance"
	xsi:schemaLocation="http://maven.apache.org/POM/4.0.0 https://maven.apache.org/xsd/maven-4.0.0.xsd">
	<modelVersion>4.0.0</modelVersion>
	<parent>
		<groupId>org.springframework.boot</groupId>
		<artifactId>spring-boot-starter-parent</artifactId>
		<version>2.4.4</version>
		<relativePath /> <!-- lookup parent from repository -->
	</parent>
	<groupId>com.javacodepoint</groupId>
	<artifactId>SpringBootFileUpload</artifactId>
	<version>0.0.1-SNAPSHOT</version>
	<name>SpringBootFileUpload</name>
	<description>Spring Boot File Upload</description>
	<properties>
		<java.version>1.8</java.version>
	</properties>
	<dependencies>
		<dependency>
			<groupId>org.springframework.boot</groupId>
			<artifactId>spring-boot-starter-web</artifactId>
		</dependency>
		<dependency>
			<groupId>org.springframework.boot</groupId>
			<artifactId>spring-boot-starter-thymeleaf</artifactId>
		</dependency>
		<dependency>
			<groupId>org.springframework.boot</groupId>
			<artifactId>spring-boot-devtools</artifactId>
			<scope>runtime</scope>
			<optional>true</optional>
		</dependency>
		<dependency>
			<groupId>org.springframework.boot</groupId>
			<artifactId>spring-boot-starter-test</artifactId>
			<scope>test</scope>
		</dependency>
	</dependencies>
	<build>
		<plugins>
			<plugin>
				<groupId>org.springframework.boot</groupId>
				<artifactId>spring-boot-maven-plugin</artifactId>
			</plugin>
		</plugins>
	</build>
</project>
Understand Required Spring Boot Dependencies
spring-boot-starter-web (Spring Web) :
It is used for building web applications, including RESTful applications using Spring MVC. It uses Tomcat as the default embedded container. The single spring-boot-starter-web dependency pulls in all dependencies related to web development.
spring-boot-starter-thymeleaf (Thymeleaf) :
Thymeleaf is a Java library. It is an XML/XHTML/HTML5 template engine that can apply a set of transformations to template files to display data and/or text produced by your applications.
spring-boot-devtools (Spring Boot DevTools) :
DevTools includes an embedded LiveReload server. LiveReload is a simple protocol that allows your application to automatically trigger a browser refresh whenever things change.
spring-boot-starter-test (Spring Boot Test) :
This starter includes Spring-specific dependencies and dependencies for auto-configuration and a set of testing libraries such as JUnit, etc.
Javascript Ajax Progress Bar Implementation
Let’s understand the implementation of the progress bar with sample points by referring to the below filesupload.html file:
- In the below example, we are taking some global variables(totalFileCount, fileUploadCount, fileSize, successCount) to store specific data.
- When the user will click on the Upload file button, the function
startUploading()will be called. This is the initiation function of file upload. Here we are initializing the defined global variables. - Before initiating the file uploads, we are calling the function
prepareProgressBarUI()to design the progress bar UI. - Here we are using
XMLHttpRequesta Javascript class object to do the Ajax call. You can see in the functionuploadFile(). FormDataa class object is used to attach the multipart file usingappend()method in order to upload it.- progress, load, and error are the events that are fired when file upload happens. So we are going to bind these events with function
onUploadProgress(),onUploadComplete(), andonUploadError()respectively. - The function
onUploadProgress()will be continuously called and updated on the progress bar. Here e.loaded will tell how many bytes have been uploaded to the server, so based on that we are calculating the percentage of the progress bar. - The function
onUploadComplete()will be called when a file gets uploaded completely to the server. Here we are doing the next Ajax call if more files are yet to be uploaded otherwise updating 100% for the progress bar. - The function onUploadError() will be called when an error occurs while uploading the files.
filesupload.html
<html>
<head>
<title>Javacodepoint</title>
<link rel="stylesheet"
    href="https://maxcdn.bootstrapcdn.com/bootstrap/3.4.1/css/bootstrap.min.css">
<link rel="stylesheet"
    href="https://stackpath.bootstrapcdn.com/font-awesome/4.7.0/css/font-awesome.min.css">
<script src="https://ajax.googleapis.com/ajax/libs/jquery/3.5.1/jquery.min.js"></script>
<style>
.action-icon{padding:5px;cursor:pointer;color:#fff}
.table{font-size:11px;}
.table>tbody>tr>td{padding: 2px 6px;vertical-align: middle;border:none;}
#main-container{padding: 0px 20px 40px; width: 52%;}
#upload-status-container{display:none;}
#upload-header{height:35px;width:100%;background-color: #323254;color: #fff;padding: 8px;border-top-left-radius: 10px;border-top-right-radius: 10px;}
#progress-bar-container{padding:20px;max-height:260px;overflow-y:auto;border:1px solid #323254;}
::-webkit-scrollbar {background-color: #fff; width: 8px; height: 8px;}
::-webkit-scrollbar-thumb {background-color: #C0C0C0; border-radius: 10px;}
</style>
</head>
<body>
    <div id="main-container">
        <h3 class="text-info">Spring Boot file upload with advance progress-bar using Ajax</h3>
        <hr>
        <div style="margin-bottom: 20px">
            <input type="file" id="files" multiple style="margin-bottom: 20px" />
            <button class="btn btn-primary" type="button" onclick="startUploading()" ><i class="fa fa-upload"></i> Upload file</button>
        </div>
        <div id="upload-status-container">
            <div id="upload-header">
                <span id="upload-header-text"></span>
                <i class="action-icon fa fa-window-minimize pull-right" onclick="showHide(this)" title="minimize"></i>
            </div>
            <div id="progress-bar-container">
                <table class="table">
                    <tbody></tbody>
                </table>
            </div>
        </div>
    </div>
</body>
<script>
    /* Globle variables */
    var totalFileCount, fileUploadCount, fileSize, successCount;

    /* start uploading files */
    function startUploading() {
        var files = document.getElementById('files').files;
        if(files.length==0){
            alert("Please choose at least one file and try.");
            return;
        }
        fileUploadCount=0;
        successCount = 0;
        prepareProgressBarUI(files);

        // upload through ajax call
        uploadFile();
    }

    /* This method will be called to prepare progress-bar UI */
    function prepareProgressBarUI(files){
        totalFileCount = files.length;
        var $tbody=$("#progress-bar-container").find("tbody");
        $tbody.empty();
        $("#upload-header-text").html("1 of "+totalFileCount+" file(s) is uploading");
        for(var i=0;i<totalFileCount;i++){
            var fsize=parseFileSize(files[i].size);
            var fname=files[i].name;
            var bar='<tr id="progress-bar-'+i+'"><td style="width:75%"><div class="filename">'+fname+'</div>'
            +'<div class="progress"><div class="progress-bar progress-bar-striped active" style="width:0%"></div></div><div class="error-msg text-danger"></div></td>'
            +'<td  style="width:25%"><span class="size-loaded"></span> '+fsize+' <span class="percent-loaded"></span></td></tr>';
            $tbody.append(bar);
        }
        $("#upload-status-container").show();
    }

    /* parse the file size in kb/mb/gb */
    function parseFileSize(size){
        var precision=1;
        var factor = Math.pow(10, precision);
        size = Math.round(size / 1024); //size in KB
        if(size < 1000){
            return size+" KB";
        }else{
            size = Number.parseFloat(size / 1024); //size in MB
            if(size < 1000){
                return (Math.round(size * factor) / factor) + " MB";
            }else{
                size = Number.parseFloat(size / 1024); //size in GB
                return (Math.round(size * factor) / factor) + " GB";
            }
        }
        return 0;
    }

    /* one by one file will be uploaded to the server by ajax call*/
    function uploadFile() {
        var file = document.getElementById('files').files[fileUploadCount];
        fileSize = file.size;
        var xhr = new XMLHttpRequest();
        var fd = new FormData();
        fd.append("multipartFile", file);
        xhr.upload.addEventListener("progress", onUploadProgress, false);
        xhr.addEventListener("load", onUploadComplete, false);
        xhr.addEventListener("error", onUploadError, false);
        xhr.open("POST", "/api/fileupload");
        xhr.send(fd);

    }

    /* This function will continueously update the progress bar */
    function onUploadProgress(e) {
        if (e.lengthComputable) {
        	var loaded = e.loaded;
            var percentComplete = parseInt((loaded) * 100 / fileSize);
            if(percentComplete < 100){
            	var pbar = $('#progress-bar-'+fileUploadCount);
                var bar=pbar.find(".progress-bar");
                var sLoaded=pbar.find(".size-loaded");
                var pLoaded=pbar.find(".percent-loaded");
            	bar.css("width",percentComplete + '%');
                sLoaded.html(parseFileSize(loaded)+ " / ");
                pLoaded.html("("+percentComplete+ "%)");
            }
        } else {
            alert('unable to compute');
        }
    }

    /* This function will call when upload is completed */
    function onUploadComplete(e, error) {
        var pbar = $('#progress-bar-'+fileUploadCount);
    	var bar = pbar.find(".progress-bar");
        if(e.currentTarget.responseText!="" || error){
        	bar.removeClass("active").addClass("progress-bar-danger");
        	pbar.find(".error-msg").html(e.currentTarget.responseText || "Something went wrong!");
        }else{
        	bar.removeClass("active");
        	bar.css("width",'100%');
        	var sLoaded=pbar.find(".size-loaded");
        	var pLoaded=pbar.find(".percent-loaded");
        	sLoaded.html('<i class="fa fa-check text-success"></i> ');
        	pLoaded.html("(100%)");
        	successCount++;
        }
        fileUploadCount++;
        if (fileUploadCount < totalFileCount) {
            //ajax call if more files are there
            uploadFile();
            $("#upload-header-text").html((fileUploadCount+1)+" of "+totalFileCount+" file(s) is uploading");
        } else if(successCount==0){
            $("#upload-header-text").html("Error while uploading");
        } else{
        	$("#upload-header-text").html(successCount+" of "+totalFileCount+" file(s) uploaded successfully");
        }
    }

    /* This function will call when an error come while uploading */
    function onUploadError(e) {
        console.error("Something went wrong!");
        onUploadComplete(e,true);
    }

    function showHide(ele){
        if($(ele).hasClass('fa-window-minimize')){
            $(ele).removeClass('fa-window-minimize').addClass('fa-window-restore').attr("title","restore");
            $("#progress-bar-container").slideUp();
        }else{
            $(ele).addClass('fa-window-minimize').removeClass('fa-window-restore').attr("title","minimize");
            $("#progress-bar-container").slideDown();
        }
    }
</script>
</html>
Create File Upload Rest Controller
Let’s understand the file upload rest controller with sample points by referring the below FileUploadRestController.java file:
- Spring
@RestControllerannotation is used to create RESTful web services using Spring MVC. Spring RestController takes care of mapping request data to the defined request handler method. @PostMappingannotated methods handle the HTTP POST requests matched with the given URI expression (eg. @PostMapping(“/api/fileupload”) ).- The
@RequestParamis used to read the HTML form data provided by a user and bind it to the request parameter. Here we are using it to collect MultipartFile, Eg- @RequestParam(“multipartFile”) MultipartFile uploadfile. - UPLOAD_PATH = “C://uploads//”, we are taking it for a location to save uploaded files on the server.
Files.write(), the method is used to save the collected files on a specified server location.
FileUploadRestController.java
package com.javacodepoint.fileupload;

import java.nio.file.Files;
import java.nio.file.Path;
import java.nio.file.Paths;

import org.springframework.web.bind.annotation.PostMapping;
import org.springframework.web.bind.annotation.RequestParam;
import org.springframework.web.bind.annotation.RestController;
import org.springframework.web.multipart.MultipartFile;

@RestController
public class FileUploadRestController {

	/**
     * Location to save uploaded files on server
     */
	private static String UPLOAD_PATH = "C://uploads//";

	/*
	 * single file upload in a request
	 */
	@PostMapping("/api/fileupload")
	public void uploadFile(@RequestParam("multipartFile") MultipartFile uploadfile) {

		if (uploadfile.isEmpty()) {
			System.out.println("please select a file!");
		}

		try {
			byte[] bytes = uploadfile.getBytes();
			Path path = Paths.get(UPLOAD_PATH + uploadfile.getOriginalFilename());
			Files.write(path, bytes);
		} catch (Exception e) {
			e.printStackTrace();
		}
	}
}
Multipart Properties Configuration
application.properties
# Multipart Properties

# Max size for a single file
spring.servlet.multipart.max-file-size=50MB

# Max size for a single request
spring.servlet.multipart.max-request-size=1024MB
Create a Welcome Page Controller
WelcomePageController.java
package com.javacodepoint.fileupload;

import org.springframework.stereotype.Controller;
import org.springframework.web.bind.annotation.GetMapping;

@Controller
public class WelcomePageController {

    @GetMapping("/")
    public String index() {
        return "filesupload";
    }
}
Create a Global Exception Handler
GlobleExceptionHandler.java
package com.javacodepoint.fileupload;

import javax.servlet.http.HttpServletRequest;

import org.springframework.http.HttpStatus;
import org.springframework.http.ResponseEntity;
import org.springframework.web.bind.annotation.ControllerAdvice;
import org.springframework.web.bind.annotation.ExceptionHandler;
import org.springframework.web.bind.annotation.ResponseBody;
import org.springframework.web.multipart.MultipartException;

@ControllerAdvice
public class GlobleExceptionHandler {

	@ExceptionHandler(MultipartException.class)
    @ResponseBody
    ResponseEntity<?> handleControllerException(HttpServletRequest request, Throwable e) {
        HttpStatus status = getStatus(request);
        return new ResponseEntity<String>(e.getMessage(), status);
    }

    private HttpStatus getStatus(HttpServletRequest request) {
        Integer statusCode = (Integer) request.getAttribute("javax.servlet.error.status_code");
        if (statusCode == null) {
            return HttpStatus.INTERNAL_SERVER_ERROR;
        }
        return HttpStatus.valueOf(statusCode);
    }
}
Spring Boot File Upload Application Startup
We use the @SpringBootApplication annotation in our Application or Main class to enable a host of features, e.g. Java-based Spring configuration, component scanning, and in particular for enabling Spring Boot’s auto-configuration feature.
SpringBootFileUploadApplication.java
package com.javacodepoint.fileupload;

import org.springframework.boot.SpringApplication;
import org.springframework.boot.autoconfigure.SpringBootApplication;

@SpringBootApplication
public class SpringBootFileUploadApplication {

	public static void main(String[] args) {
		SpringApplication.run(SpringBootFileUploadApplication.class, args);
	}
}
Run The Spring Boot File Upload Application
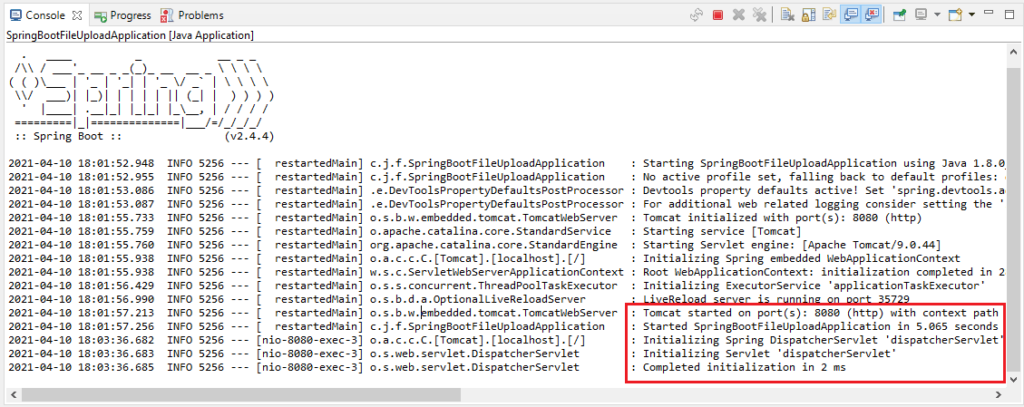
Right-click on SpringBootFileUploadApplication.java > Run As > Java Application then it will start the configured Tomcat server as you can see in the below image:
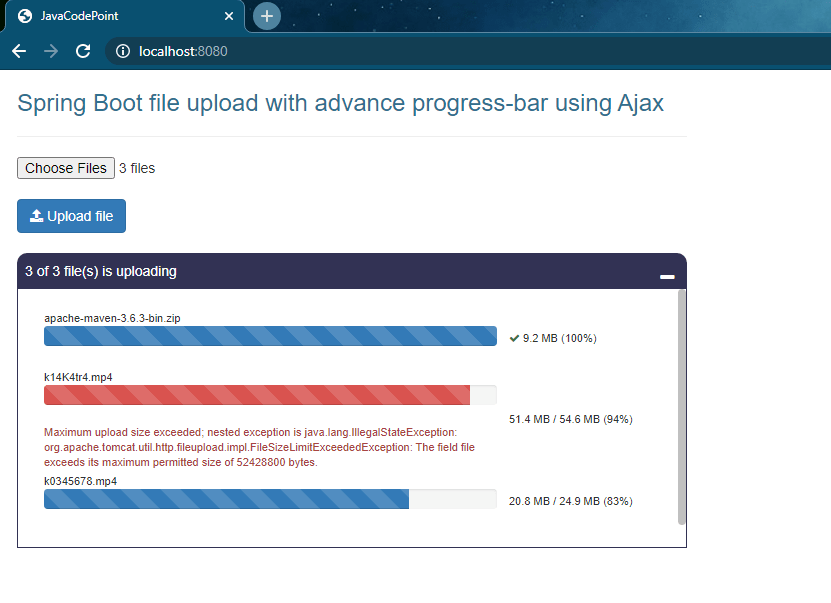
Let’s access the URL: localhost:8080 in any browser like below:
Conclusion
In this article, you have seen how to create a Spring boot file upload application with an advanced progress bar using the Spring Tool Eclipse plugin and Maven.
Create a drag-and-drop file uploader UI to upload single as well as multiple files at a time. Visit another article: Drag and Drop File Uploader UI.
Hope you like it!
Related Articles:
- File Upload in Java Servlet Example
- Multiple file uploads in Java with Progress bar – Ajax
- Step-by-step Java file upload | Ajax Progress bar
- Ajax File Upload with Advance Progress Bar in Java
2D Array AI Ajax Angular MCQs Apache Kafka Apache POI ArrayList Array Programs Bootstrap Bootstrap MCQs ChatGPT CSS CSS MCQs Docker MCQs Eclipse Excel File Upload Game Programs HTML HTML MCQs HTML Tutorial Jackson JSON Java Java MCQ Java Programs Javascript Javascript MCQs JDK jQuery JSON JSON MCQs Kafka MCQs Kubernetes MCQs List Collection Logical Programs Maven MCQs MongoDB MCQs Pattern Programs Quizzes Software Installation Spring Boot SQL MCQs Web technologies MCQs Windows
