Creating a Spring Boot Project with Eclipse and Maven is quite simple. In this article, you will learn the different ways of creating Spring Boot Projects by using Eclipse IDE and Maven Tool.

Table of Contents
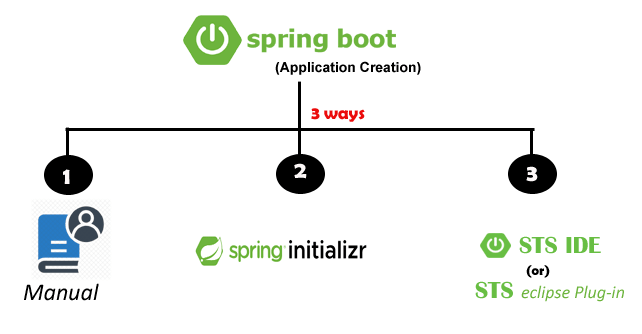
There are three ways to create Spring Boot Projects with Eclipse and Maven
- Manual by adding Spring Boot Starter Dependencies
- Spring Initializr
- Spring Tool Suite (STS) or STS Eclipse Plugin
Software Dependency
- Spring Initializr
- JDK 1.8 ( installation steps )
- Apache Maven 3.6.3 ( installation steps )
- Apache Tomcat-8.0.36 ( installation steps )
- Eclipse IDE 2020-06 ( Download )
We will use these software dependencies to explore the above three ways of creating Spring Boot projects with Eclipse and Maven.
How to create a Spring Boot Project Manually?
Creating a Spring Boot Project manually is a good practice for the beginner developer. Let’s follow the below steps to create it manually:
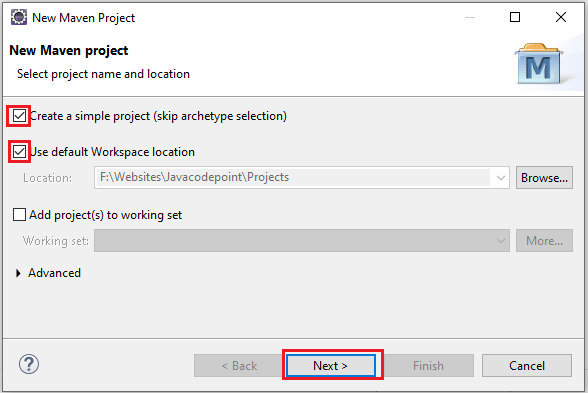
Step-1. Open Eclipse IDE, click on File > New > Maven Project
Here you just check for Create a simple project (skip archetype selection), and Use default Workspace location as the below image and click on the Next button.

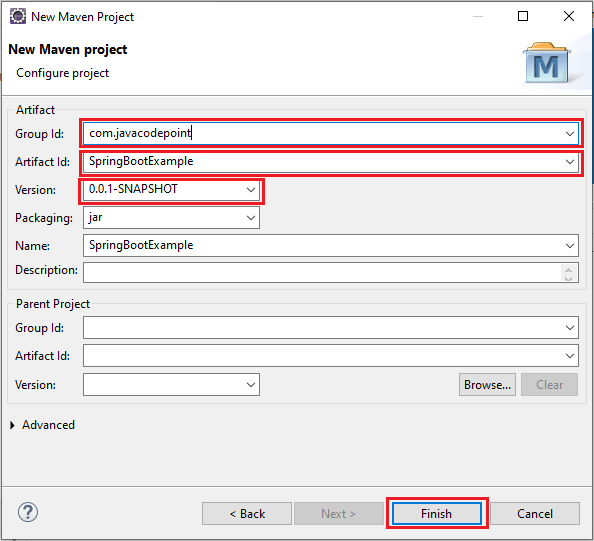
Step-2. Provide Group Id: com.javacodepoint, Artifact Id: SpringBootExample, and Version: 0.0.1-SNAPSHOT then click on the Finish button as you can see below image:

Once you click on the Finish button you will get the basic Maven project structure got created in your Eclipse workspace.
Step-3. Now update your pom.xml file with spring-boot-starter-parent, appropriate starters dependencies, and some properties.
Add below spring-boot-starter-parent into the pom.xml:
<parent>
	<groupId>org.springframework.boot</groupId>
	<artifactId>spring-boot-starter-parent</artifactId>
	<version>2.4.4</version>
	<relativePath /> <!-- lookup parent from repository -->
</parent>
Add below spring boot starters dependencies:
<dependency>
	<groupId>org.springframework.boot</groupId>
	<artifactId>spring-boot-starter-web</artifactId>
</dependency>
<dependency>
	<groupId>org.springframework.boot</groupId>
	<artifactId>spring-boot-starter-test</artifactId>
	<scope>test</scope>
</dependency>
Add below Java version configuration property:
<properties>
	<java.version>1.8</java.version>
</properties>
Now complete pom.xml file looks like this:
<project xmlns="http://maven.apache.org/POM/4.0.0"
	xmlns:xsi="http://www.w3.org/2001/XMLSchema-instance"
	xsi:schemaLocation="http://maven.apache.org/POM/4.0.0 https://maven.apache.org/xsd/maven-4.0.0.xsd">
	<modelVersion>4.0.0</modelVersion>
	<parent>
		<groupId>org.springframework.boot</groupId>
		<artifactId>spring-boot-starter-parent</artifactId>
		<version>2.4.4</version>
		<relativePath /> <!-- lookup parent from repository -->
	</parent>
	<groupId>com.javacodepoint</groupId>
	<artifactId>SpringBootExample</artifactId>
	<version>0.0.1-SNAPSHOT</version>
	<name>SpringBootExample</name>
	<properties>
		<java.version>1.8</java.version>
	</properties>
	<dependencies>
		<dependency>
			<groupId>org.springframework.boot</groupId>
			<artifactId>spring-boot-starter-web</artifactId>
		</dependency>
		<dependency>
			<groupId>org.springframework.boot</groupId>
			<artifactId>spring-boot-starter-test</artifactId>
			<scope>test</scope>
		</dependency>
	</dependencies>
</project>
Step-4. Create a new Package under src/main/java. Right-click on src/main/java > New > Package and then type Package name: com.javacodepoint.example
Step-5. Create a new Application Class under the created package. Right-click on com.javacodepoint.example > New > Class and then type Class name: SpringBootExampleApplication
Once SpringBootExampleApplication.java class got created, copy the below code and paste it there:
package com.javacodepoint.example;

import org.springframework.boot.SpringApplication;
import org.springframework.boot.autoconfigure.SpringBootApplication;

@SpringBootApplication
public class SpringBootExampleApplication {
	public static void main(String[] args) {
		SpringApplication.run(SpringBootExampleApplication.class, args);
	}
}
Note: @SpringBootApplication annotation and SpringApplication.run() static method is used to launch the Spring Application Context.
Step-6. Create a new Controller class under the same package. Right-click on com.javacodepoint.example > New > Class and then type Class name: HelloWorldController
Once HelloWorldController.java class got created, copy the below code and paste it there:
package com.javacodepoint.example;

import org.springframework.web.bind.annotation.RequestMapping;
import org.springframework.web.bind.annotation.RestController;

/**
 *
 * @author javacodepoint
 *
 */
@RestController
public class HelloWorldController {
	@RequestMapping("/")
	public String hello() {
		return "Hello World!";
	}
}
That’s all about the manual process of creating a spring boot project. Here you have successfully created a Hello World sample Application.
Now when you launch SpringBootExampleApplication.java class, you would see that an embedded tomcat server would launch up and you are ready to test the Hello World application like the below images:


How to create a Spring Boot Project using Spring Initializr?
Creating a Spring Boot Project using Spring Initializr is quite simple. You can see the complete creation process in another article:
Spring Boot Hello World Example using Spring Initializr
How to create a Spring Boot Project using STS or STS Eclipse Plugin?
Creating a Spring Boot Project using STS Eclipse Plugin is also a very simple process. You can see the complete process below link:
Spring Boot Hello World Example using STS Eclipse Plugin
Conclusion
In this article, we have seen 3 different ways to create Spring Boot Projects with Eclipse and Maven.
Hope you like it.
