In this article, you will learn Jackson JSON Setup through the step-by-step process guide for a standalone Java application in Eclipse IDE.
Table of Contents
1. Introduction to Java Jackson JSON library
The Java Jackson JSON library, made by FasterXML, is important for Java programs to work well with JSON data. It helps convert Java objects to JSON and vice versa easily. Jackson also lets developers customize it, making data work better in their programs. It’s very useful in making modern software.
2. Jackson JSON Setup – Prerequisites
The below-listed software should be installed on your system.
- Java JDK Installation steps
- Eclipse IDE Download link
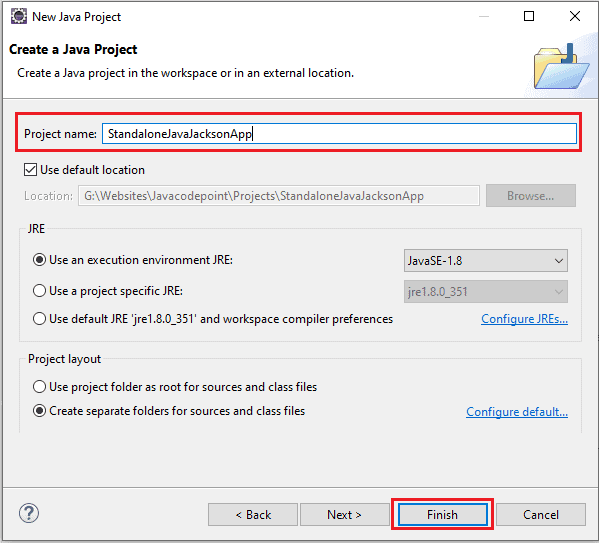
3. Setting up a Java Project in Eclipse IDE
- Launch Eclipse IDE.
- Click on “File” > “New” > “Java Project”.
- Enter a project name and click “Finish” to create the Java project.

4. Downloading Jackson JSON Dependencies
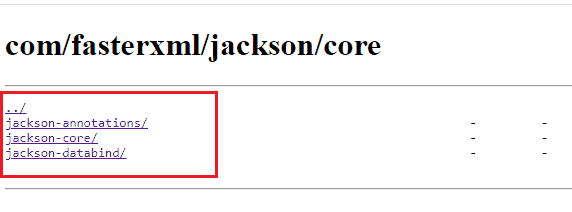
Visit the Jackson Maven repository: https://repo1.maven.org/maven2/com/fasterxml/jackson/core/
Once you open the link, you will get a download page like the below image:

Now download the below three jars (choose the latest version) separately one by one from the above download page:
- jackson-core-2.15.2.jar
- jackson-databind-2.15.2.jar
- jackson-annotations-2.15.2.jar
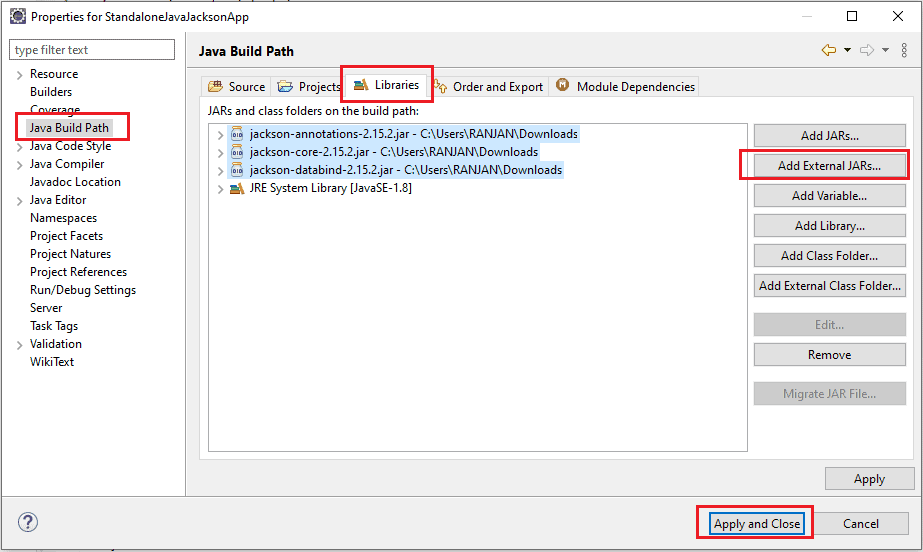
5. Adding Jackson JARs to the Eclipse Project
- In Eclipse, right-click on your project in the Project Explorer and select “Properties”.
- Navigate to the “Java Build Path” > “Libraries” tab.
- Click “Add External JARs…” and browse the downloaded jars location.
- Select the following JAR files:
jackson-core-{version}.jarjackson-databind-{version}.jarjackson-annotations-{version}.jar
- Click “Apply and Close” to add the JARs to your project’s build path.

6. Creating a Sample Java Class
- Create a new Java class in the source folder of your project.
- Define a sample Java class with attributes and getters/setters for serialization and deserialization examples.
Serialization and Deserialization Examples:
Suppose you have an “Employee” class in your Java program:
public class Employee {
    private String name;
    private int age;

    // Constructors, getters, setters
}
Serialization Example:
Serialization is like packing things up to send them. Imagine you have an “Employee” object with the name “Rahul” and age 30. You can use Jackson to turn this object into a JSON text that can be easily shared:
ObjectMapper objectMapper = new ObjectMapper();
Employee emp = new Employee("Rahul", 30);

String json = objectMapper.writeValueAsString(emp);
System.out.println(json);
The output JSON text might look like: {"name":"Rahul","age":30}
Deserialization Example:
Deserialization is like unpacking and understanding the JSON text. Let’s say you received the JSON text {"name":"Robert","age":25} and want to turn it back into an “Employee” object in your program:
String jsonReceived = "{\"name\":\"Robert\",\"age\":25}";

Employee emp = objectMapper.readValue(jsonReceived, Employee.class);
System.out.println("Name: " + emp.getName());
System.out.println("Age: " + emp.getAge());
OUTPUT:
Name: Robert
Age: 25
In these examples, Jackson helps convert the Java objects to JSON text when you want to share them and turns JSON text back into Java objects when you want to use the information. It’s like magic communication between computers!
Learn Jackson Serialization and Deserialization in detail here: Jackson JSON Serialization and Deserialization Example.
7. Conclusion
In this guide, we walked through the step-by-step process of setting up the Java Jackson JSON library environment for a standalone Java application in Eclipse IDE. We covered the process of downloading Jackson JSON dependencies, adding them to the project, creating a sample Java class, and providing serialization and deserialization examples. By following this guide, you can seamlessly utilize the Jackson library to handle JSON data effectively in your Java applications.
If you want to do the Jackson JSON environment setup for an Eclipse Maven Application, then visit: Java Jackson Setup for Maven Application Eclipse IDE
