In this article, you will learn how to create a sample Maven project for the Hello World application in Spring Boot with Spring Tool Suite(STS) Eclipse plug-in. Here we will use the following software dependency to create this example:
Software Dependency
- Spring Tools 3.9.14.RELEASE (Eclipse plug-in) ( installation steps )
- JDK 1.8 ( installation steps )
- Maven 3.6.3 ( installation steps )
- Tomcat -Embedded
- Eclipse IDE 2020-06 ( Download )
Step by step creation of Hello World Example
We hope the above software dependencies are already available in your system if not follow the specified installation steps to set up your spring boot application environment.
Now you just need to follow the below steps:
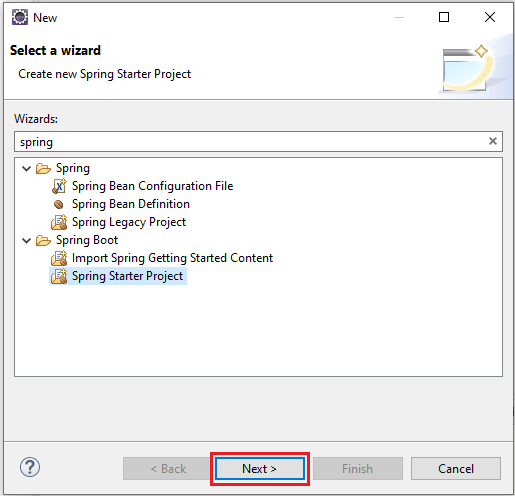
Step-1. Click on eclipse menu File > New and type spring and select Spring Starter Project then click on Next button as below image:
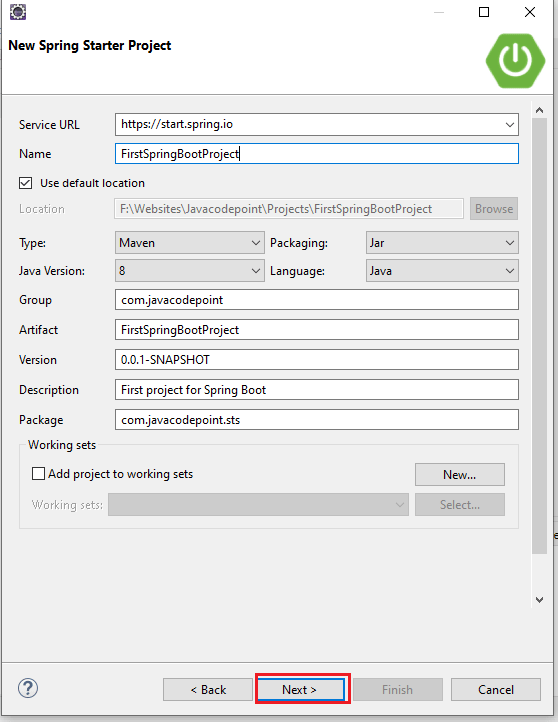
Step-2. Once you click on Next button, you will be ask for below details:
- Project Name
- Type
- Java Version
- Group Id
- Artifact Id
- Package
- etc…
Now you just provide the Project Name: FirstSpringBootProject, Type: Maven, Java Version: 8, Group: com.javacodepoint, Artifact: FirstSpringBootProject, Package: com.javacodepoint.sts as you can see the below image. After that click on the Next button.
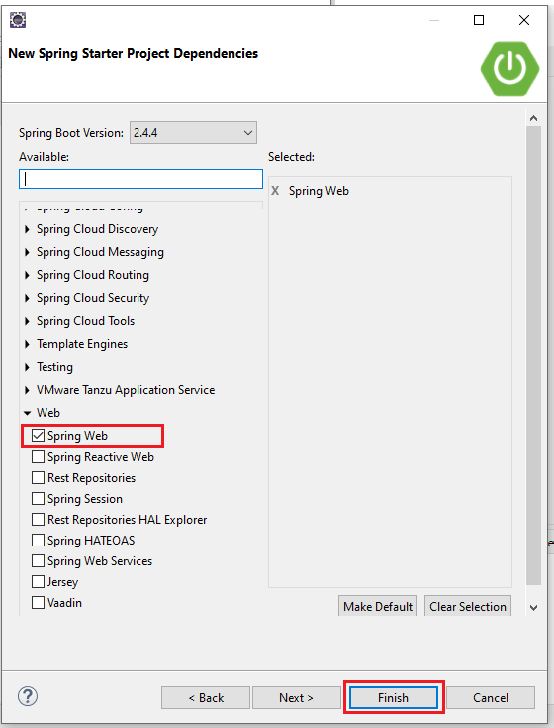
Step-3. Now select the Spring Starter Project Dependencies. Here we will select Spring Web dependency as you can see below image. After that click on the Finish button.
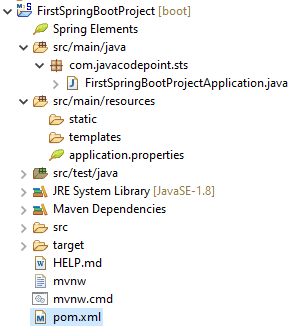
When you click on Finish button you can see the below Maven project structure got created in your eclipse:
pom.xml
<?xml version="1.0" encoding="UTF-8"?>
<project xmlns="http://maven.apache.org/POM/4.0.0" xmlns:xsi="http://www.w3.org/2001/XMLSchema-instance"
	xsi:schemaLocation="http://maven.apache.org/POM/4.0.0 https://maven.apache.org/xsd/maven-4.0.0.xsd">
	<modelVersion>4.0.0</modelVersion>
	<parent>
		<groupId>org.springframework.boot</groupId>
		<artifactId>spring-boot-starter-parent</artifactId>
		<version>2.4.4</version>
		<relativePath/> <!-- lookup parent from repository -->
	</parent>
	<groupId>com.javacodepoint</groupId>
	<artifactId>FirstSpringBootProject</artifactId>
	<version>0.0.1-SNAPSHOT</version>
	<name>FirstSpringBootProject</name>
	<description>First project for Spring Boot</description>
	<properties>
		<java.version>1.8</java.version>
	</properties>
	<dependencies>
		<dependency>
			<groupId>org.springframework.boot</groupId>
			<artifactId>spring-boot-starter-web</artifactId>
		</dependency>
		<dependency>
			<groupId>org.springframework.boot</groupId>
			<artifactId>spring-boot-starter-test</artifactId>
			<scope>test</scope>
		</dependency>
	</dependencies>
	<build>
		<plugins>
			<plugin>
				<groupId>org.springframework.boot</groupId>
				<artifactId>spring-boot-maven-plugin</artifactId>
			</plugin>
		</plugins>
	</build>
</project>
FirstSpringBootProjectApplication.java
package com.javacodepoint.sts;

import org.springframework.boot.SpringApplication;
import org.springframework.boot.autoconfigure.SpringBootApplication;

@SpringBootApplication
public class FirstSpringBootProjectApplication {

	public static void main(String[] args) {
		SpringApplication.run(FirstSpringBootProjectApplication.class, args);
	}

}
Step-4. Create a new HelloWorldController class by Right click on com.javacodepoint.sts package > New > Class and type the class name and click on the Finish button as below image:
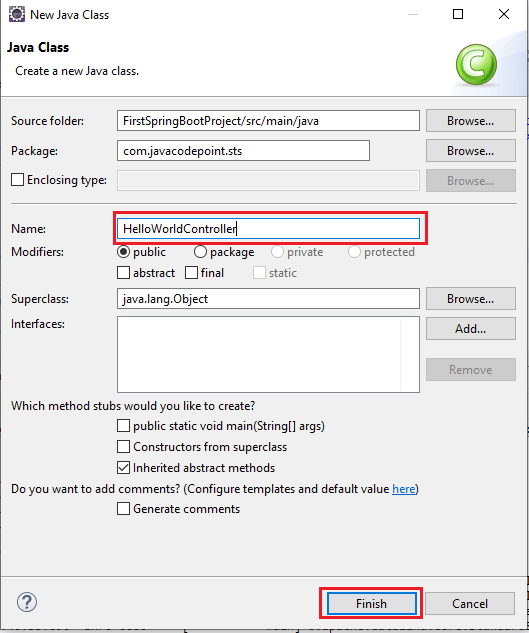
Step-5. Now copy the below code and paste it in HelloWorldController.java file.
package com.javacodepoint.sts;

import org.springframework.web.bind.annotation.RequestMapping;
import org.springframework.web.bind.annotation.RestController;

/**
 *
 * @author javacodepoint
 *
 */
@RestController
public class HelloWorldController {
	@RequestMapping("/")
	public String hello() {
		return "Hello World!";
	}
}
Step-6. Now Run the created application. Right-click on FirstSpringBootProjectApplication.java > Run As > Java Application then it will start the server as you can see the below image Started FirstSpringBootProjectApplication in 8.119 seconds.
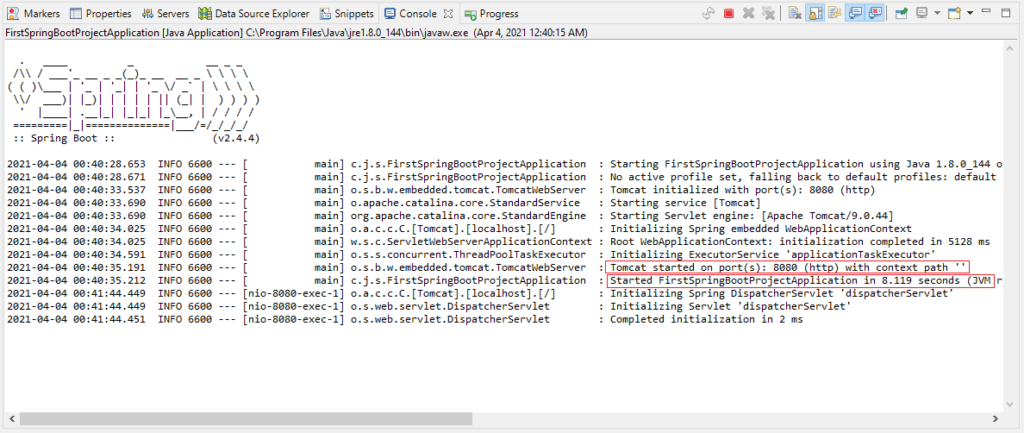
Step-7. Test the application by accessing the URL: localhost:8080/ in any browser as below image:
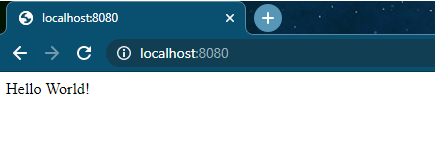
That’s all you have successfully created and executed a Hello World Spring boot application.
Hope you like it!
