In this article, we will see how do you create a Java file upload with an advanced progress bar using Ajax. This article explained you to create a Maven application in Eclipse IDE step by step. Here we are going to use the below software dependencies to develop this application.
Table of Contents
Software Dependency
- JDK 1.8 ( Installation Steps )
- Apache Maven 3.6.3 ( Installation Steps )
- Apache Tomcat 8 ( Installation Steps )
- Eclipse IDE 2020-06 ( Download )
- Windows 10
Let’s start it now. Follow the below steps:
Step-1. Open Eclipse IDE
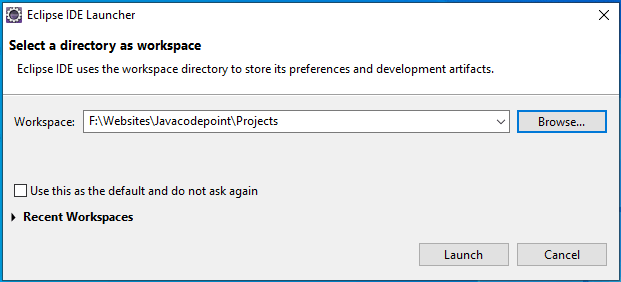
Once you open the eclipse, it will ask for the Workspace. As you can see in the below image we are taking F:\Websites\Javacodepoint\Projects as a Workspace.
Step-2. Create New Project
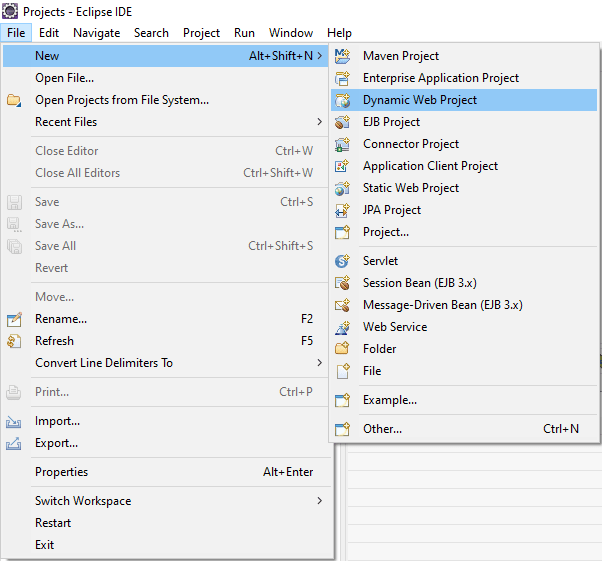
After opening eclipse IDE in the selected workspace click on File menu > New > Dynamic Web Project as below image:
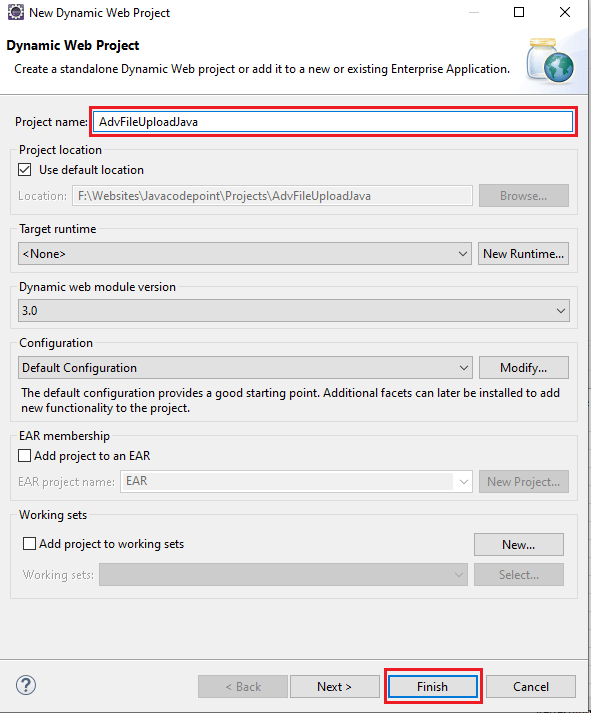
After clicking on “Dynamic Web Project”, It will ask you to type Project name. Type the Project name: AdvFileUploadJava and click on the Finish button as below image:
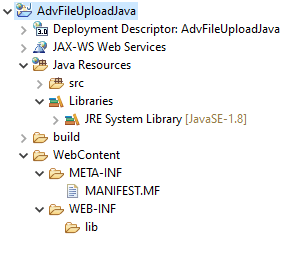
Now you can able to see the below eclipse project structure got created:
Step-3. Convert Project to Maven Project
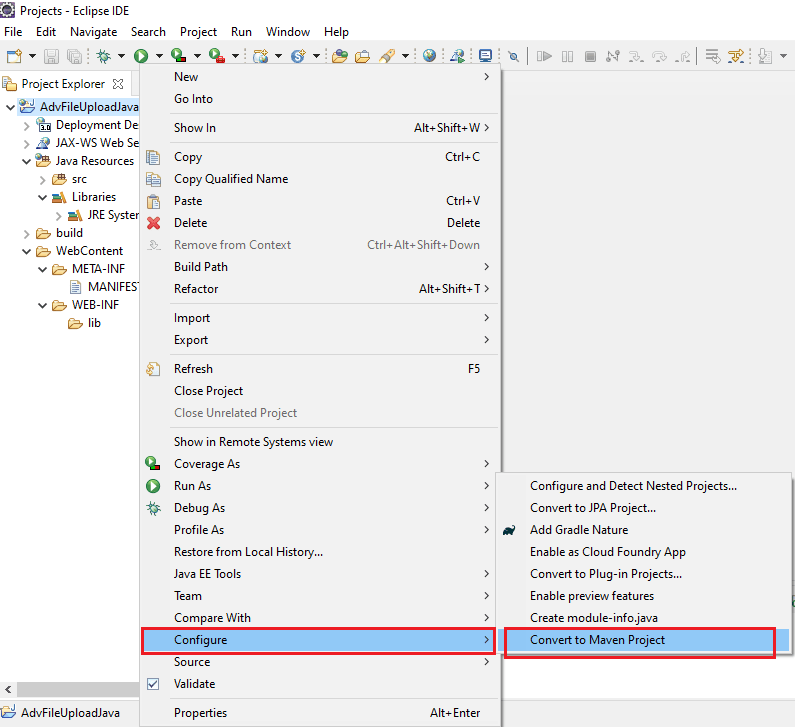
Now Just Right-click on “AdvFileUploadJava” Project > Configure > Convert to Maven Project as below image:
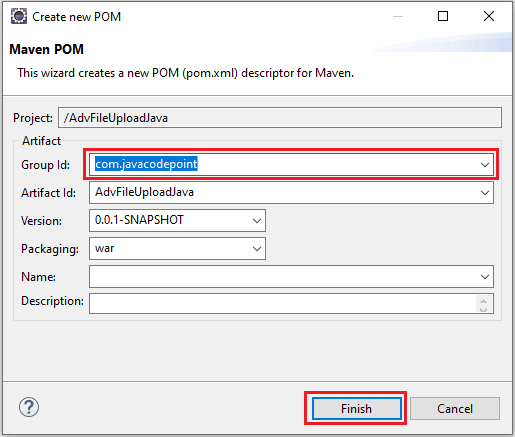
Once you click on Convert to Maven Project, you will see the below image, Here type Group Id: com.javacodepoint and click on the Finish button.
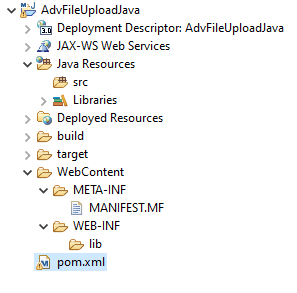
Now you can able to see the Project got successfully converted to Maven Project as below eclipse structure:
Step-4. Add Maven Dependency
In pom.xml, you need to add below javax.servlet-api maven dependency or copy the entire below pom.xml content:
      <dependency>
            <groupId>javax.servlet</groupId>
            <artifactId>javax.servlet-api</artifactId>
            <version>3.0.1</version>
            <scope>provided</scope>
      </dependency>
pom.xml
<project xmlns="http://maven.apache.org/POM/4.0.0" xmlns:xsi="http://www.w3.org/2001/XMLSchema-instance" xsi:schemaLocation="http://maven.apache.org/POM/4.0.0 https://maven.apache.org/xsd/maven-4.0.0.xsd">
  <modelVersion>4.0.0</modelVersion>
  <groupId>com.javacodepoint</groupId>
  <artifactId>AdvFileUploadJava</artifactId>
  <version>0.0.1-SNAPSHOT</version>
  <packaging>war</packaging>
  <dependencies>
        <dependency>
            <groupId>javax.servlet</groupId>
            <artifactId>javax.servlet-api</artifactId>
            <version>3.0.1</version>
            <scope>provided</scope>
        </dependency>
    </dependencies>
  <build>
    <sourceDirectory>src</sourceDirectory>
    <plugins>
      <plugin>
        <artifactId>maven-compiler-plugin</artifactId>
        <version>3.8.1</version>
        <configuration>
          <source>1.8</source>
          <target>1.8</target>
        </configuration>
      </plugin>
      <plugin>
        <artifactId>maven-war-plugin</artifactId>
        <version>3.2.3</version>
        <configuration>
          <warSourceDirectory>WebContent</warSourceDirectory>
        </configuration>
      </plugin>
    </plugins>
  </build>
</project>
Step-5. Create New Java Package
Right-click on src > New > Package as below image:
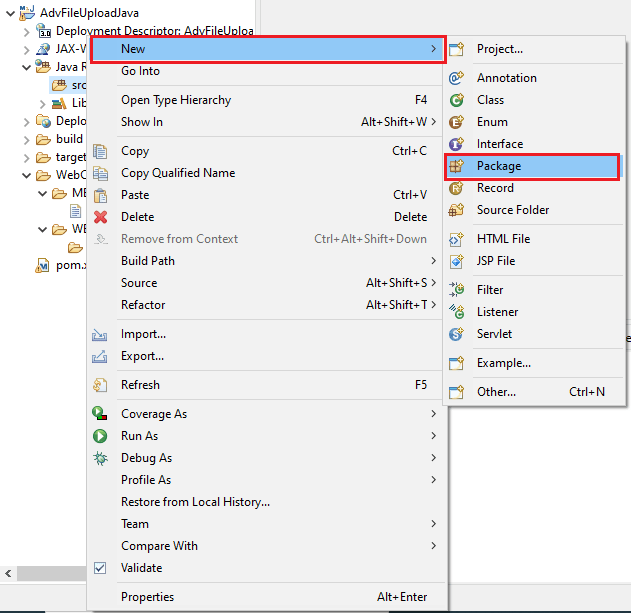
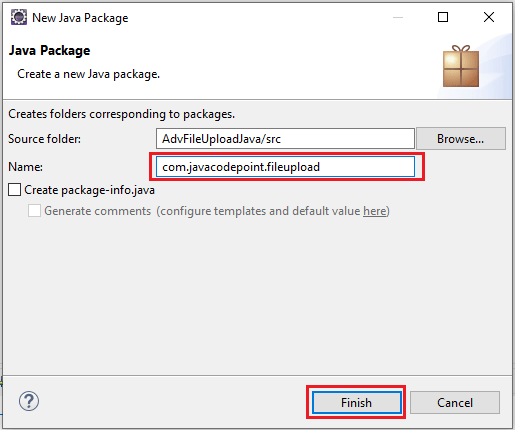
Once you click on “Package”, It will ask you to type Package name. Here you can type Name: com.javacodepoint.fileupload and click on the Finish button as below image:
Step-6. Create Servlet Class
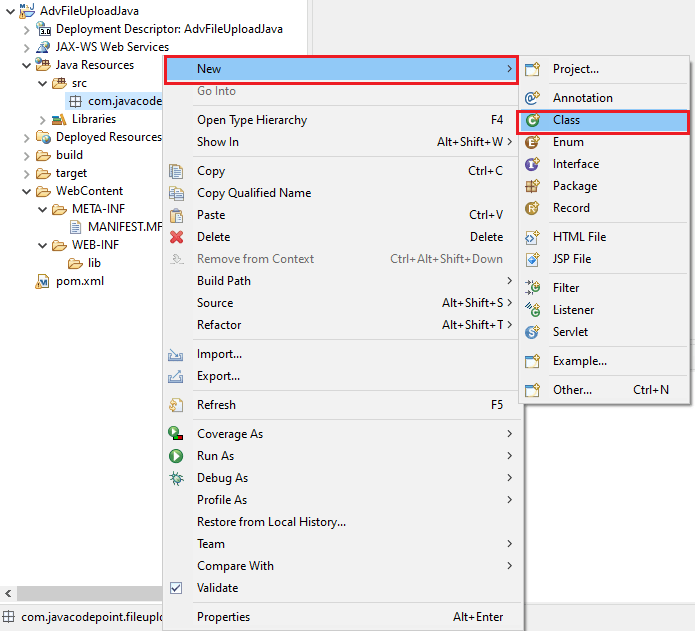
Right click on created Package(com.javacodepoint.fileupload) > New > Class as below image:
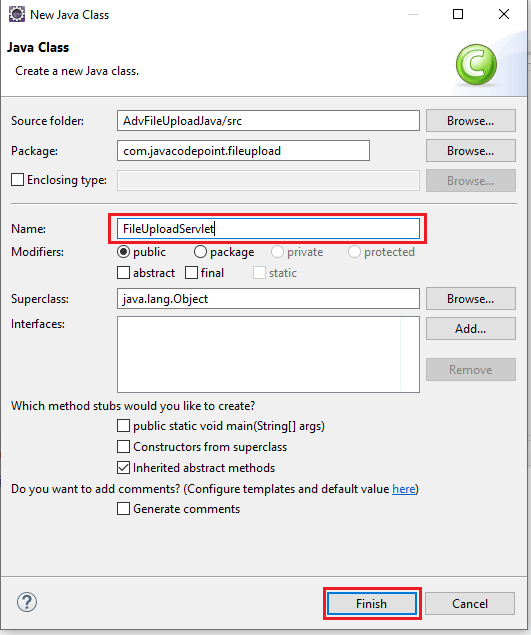
Once you click on “Class”, It will ask you to type Class name. Here you can type Name: FileUploadServlet and click on the Finish button.
Now copy the below file content and paste it in FileUploadServlet.java file:
FileUploadServlet.java
package com.javacodepoint.fileupload;

import java.io.File;
import java.io.IOException;

import javax.servlet.ServletException;
import javax.servlet.annotation.MultipartConfig;
import javax.servlet.annotation.WebServlet;
import javax.servlet.http.HttpServlet;
import javax.servlet.http.HttpServletRequest;
import javax.servlet.http.HttpServletResponse;
import javax.servlet.http.Part;
/**
 *
 * @author javacodepoint
 *
 */
@WebServlet("/UploadServlet")
@MultipartConfig(fileSizeThreshold = 1024 * 1024 * 2, // 2MB
        maxFileSize = 1024 * 1024 * 500, // 500MB
        maxRequestSize = 1024 * 1024 * 1024) // 1GB
public class FileUploadServlet extends HttpServlet {

    /**
     * Location to save uploaded files on server
     */
    private static final String UPLOAD_PATH = "C:/uploads";

    /**
     * Method to get file name from HTTP header content-disposition
     */
    private String getFileName(Part part) {
        String contentDisp = part.getHeader("content-disposition");
        String[] items = contentDisp.split(";");
        for (String s : items) {
            if (s.trim().startsWith("filename")) {
                return s.substring(s.indexOf("=") + 2, s.length() - 1);
            }
        }
        return null;
    }

    protected void doPost(HttpServletRequest request, HttpServletResponse response)
            throws ServletException, IOException {
        try {
            File uploadsPath = new File(UPLOAD_PATH);
            if (!uploadsPath.exists()) {
                //create upload folder if not exist.
                uploadsPath.mkdir();
            }
            for (Part part : request.getParts()) {
                String fileName = getFileName(part);
                if(fileName!=null) {
                    part.write(UPLOAD_PATH + File.separator + fileName);
                }
            }
            System.out.println("File uploaded successfully!");
        } catch (Exception e) {
            System.err.println("Error while uploading files!");
            e.printStackTrace();
        }
    }
}
Step-7. Create HTML file
This file contains the Html as well as Javascript Ajax code. To create it, Right-click on WebContent > New > HTML File as below image:
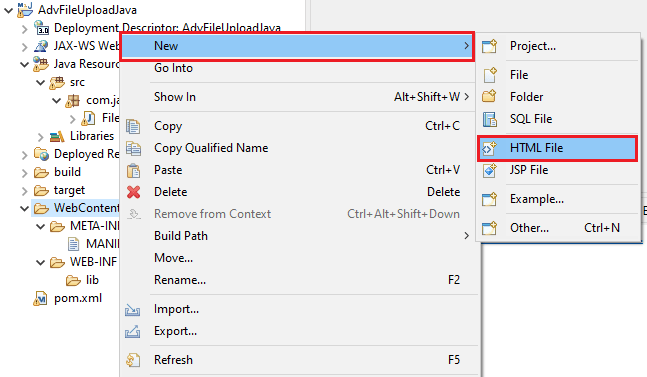
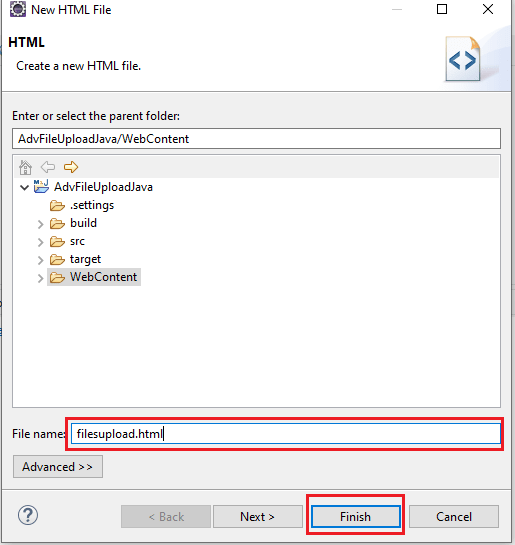
Now give the File name: filesupload.html and click on the Finish button as above image. After that copy the below file content into the filesupload.html file.
filesupload.html
<!DOCTYPE PUBLIC "-//W3C//DTD HTML 4.01 Transitional//EN" "http://www.w3.org/TR/html4/loose.dtd">
<html>
<head>
<title>JavaCodePoint</title>
<link rel="stylesheet"
    href="https://maxcdn.bootstrapcdn.com/bootstrap/3.4.1/css/bootstrap.min.css">
<link rel="stylesheet"
    href="https://stackpath.bootstrapcdn.com/font-awesome/4.7.0/css/font-awesome.min.css">
<script src="https://ajax.googleapis.com/ajax/libs/jquery/3.5.1/jquery.min.js"></script>
<style>
.action-icon{padding:5px;cursor:pointer;color:#fff}
.table{font-size:11px;}
.table>tbody>tr>td{padding: 2px 6px;vertical-align: middle;border:none;}
#main-container{padding: 0px 20px 40px; width: 50%;margin:auto;}
#upload-status-container{display:none;}
#upload-header{height:35px;width:100%;background-color: #323254;color: #fff;padding: 8px;border-top-left-radius: 10px;border-top-right-radius: 10px;}
#progress-bar-container{padding:20px;max-height:260px;overflow-y:auto;border:1px solid #323254;}
::-webkit-scrollbar {background-color: #fff; width: 8px; height: 8px;}
::-webkit-scrollbar-thumb {background-color: #C0C0C0; border-radius: 10px;}
</style>
</head>
<body>
    <div id="main-container">
        <h3 class="text-info">Advance progress-bar file upload using Ajax</h3>
        <hr>
        <div style="margin-bottom: 20px">
            <input type="file" id="files" multiple style="margin-bottom: 20px" />
            <button class="btn btn-primary" type="button" onclick="startUploading()" ><i class="fa fa-upload"></i> Upload file</button>
        </div>
        <div id="upload-status-container">
            <div id="upload-header">
                <span id="upload-header-text"></span>
                <i class="action-icon fa fa-window-minimize pull-right" onclick="showHide(this)" title="minimize"></i>
            </div>
            <div id="progress-bar-container">
                <table class="table">
                    <tbody></tbody>
                </table>
            </div>
        </div>
    </div>
</body>
<script>
    /* Globle variables */
    var totalFileCount, fileUploadCount, fileSize;

    /* start uploading files */
    function startUploading() {
        var files = document.getElementById('files').files;
        if(files.length==0){
            alert("Please choose at least one file and try.");
            return;
        }
        fileUploadCount=0;
        prepareProgressBarUI(files);

        // upload through ajax call
        uploadFile();
    }

    /* This method will be called to prepare progress-bar UI */
    function prepareProgressBarUI(files){
        totalFileCount = files.length;
        var $tbody=$("#progress-bar-container").find("tbody");
        $tbody.empty();
        $("#upload-header-text").html("1 of "+totalFileCount+" file(s) is uploading");
        for(var i=0;i<totalFileCount;i++){
            var fsize=parseFileSize(files[i].size);
            var fname=files[i].name;
            var bar='<tr id="progress-bar-'+i+'"><td style="width:75%"><div class="filename">'+fname+'</div>'
            +'<div class="progress"><div class="progress-bar progress-bar-striped active" style="width:0%"></div></div></td>'
            +'<td  style="width:25%"><span class="size-loaded"></span> '+fsize+' <span class="percent-loaded"></span></td></tr>';
            $tbody.append(bar);
        }
        $("#upload-status-container").show();
    }

    /* parse the file size in kb/mb/gb */
    function parseFileSize(size){
        var precision=1;
        var factor = Math.pow(10, precision);
        size = Math.round(size / 1024); //size in KB
        if(size < 1000){
            return size+" KB";
        }else{
            size = Number.parseFloat(size / 1024); //size in MB
            if(size < 1000){
                return (Math.round(size * factor) / factor) + " MB";
            }else{
                size = Number.parseFloat(size / 1024); //size in GB
                return (Math.round(size * factor) / factor) + " GB";
            }
        }
        return 0;
    }

    /* one by one file will be uploaded to the server by ajax call*/
    function uploadFile() {
        var file = document.getElementById('files').files[fileUploadCount];
        fileSize = file.size;
        var xhr = new XMLHttpRequest();
        var fd = new FormData();
        fd.append("multipartFile", file);
        xhr.upload.addEventListener("progress", onUploadProgress, false);
        xhr.addEventListener("load", onUploadComplete, false);
        xhr.addEventListener("error", onUploadError, false);
        xhr.open("POST", "UploadServlet");
        xhr.send(fd);

    }

    /* This function will continueously update the progress bar */
    function onUploadProgress(e) {
        if (e.lengthComputable) {
            var percentComplete = parseInt((e.loaded) * 100 / fileSize);
            var pbar = $('#progress-bar-'+fileUploadCount);
            var bar=pbar.find(".progress-bar");
            var sLoaded=pbar.find(".size-loaded");
            var pLoaded=pbar.find(".percent-loaded");
            bar.css("width",percentComplete + '%');
            sLoaded.html(parseFileSize(e.loaded)+ " / ");
            pLoaded.html("("+percentComplete+ "%)");
        } else {
            alert('unable to compute');
        }
    }

    /* This function will call when upload is completed */
    function onUploadComplete(e, error) {
        var pbar = $('#progress-bar-'+fileUploadCount);
        if(error){
            pbar.find(".progress-bar").removeClass("active").addClass("progress-bar-danger");
        }else{
            pbar.find(".progress-bar").removeClass("active");
            pbar.find(".size-loaded").html('<i class="fa fa-check text-success"></i> ');
        }
        fileUploadCount++;
        if (fileUploadCount < totalFileCount) {
            //ajax call if more files are there
            uploadFile();
            $("#upload-header-text").html((fileUploadCount+1)+" of "+totalFileCount+" file(s) is uploading");
        } else {
            $("#upload-header-text").html("File(s) uploaded successfully!");
        }
    }

    /* This function will call when an error come while uploading */
    function onUploadError(e) {
        console.error("Something went wrong!");
        onUploadComplete(e,true);
    }

    function showHide(ele){
        if($(ele).hasClass('fa-window-minimize')){
            $(ele).removeClass('fa-window-minimize').addClass('fa-window-restore').attr("title","restore");
            $("#progress-bar-container").slideUp();
        }else{
            $(ele).addClass('fa-window-minimize').removeClass('fa-window-restore').attr("title","minimize");
            $("#progress-bar-container").slideDown();
        }
    }
</script>
</html>
Step-8. Configure Tomcat Server
In order to run the application in eclipse, a Server needs to be configured. To configure Tomcat Server you can follow the Configuration steps here.
Step-9. Run the Application
To Run the application, Right-click on Project(AdvFileUploadJava) > Run As > Run on Server as below image:
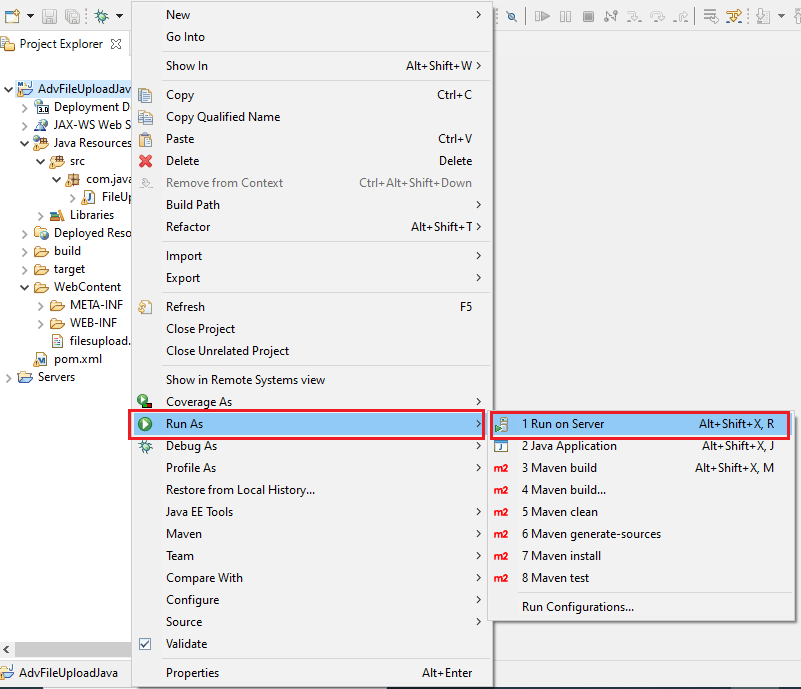
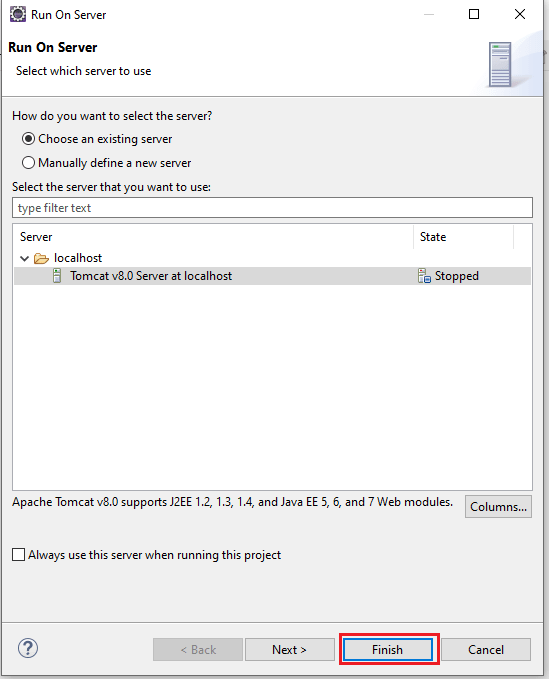
Now choose Tomcat v8.0 Server and click on the Finish button. After that access the below URL in any browser as below:
URL: http://localhost:8081/AdvFileUploadJava/filesupload.html ( make sure about your server port number )
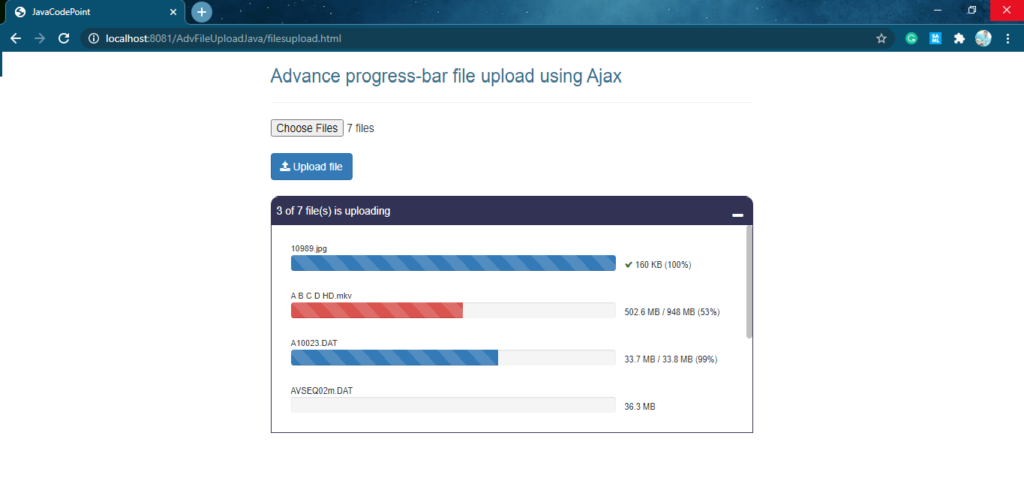
That’s it you have created the application and successfully executed it.
Conclusion
In this article, you have seen the step-by-step guide for creating file upload with javascript ajax. You have also seen the bootstrap file upload progress bar for uploading multiple files at a time.
Hope you like this article!
Related Articles:
- File Upload in Java Servlet Example
- Multiple file upload in Java with Progress bar – Ajax
- Spring Boot File Upload with Advance Progress bar in Ajax
- File upload validations in javascript

I used to be recommended this website by way of my cousin.
I’m not certain whether or not this put up is written by way of him as nobody else know
such distinctive approximately my difficulty.
You are wonderful! Thanks!
Spot on with this write-up, I absolutely think this
amazing site needs much more attention. I’ll probably be back again to see more, thanks
for the advice!
I know this website offers quality dependent articles or reviews
and additional information, is there any other web page which presents these
kinds of data in quality?