In this article, we will see how to create a first spring boot hello world example application using Spring Initializr. Here we will use the following software dependency to create this example:
Table of Contents
Software Dependency
- Spring Initializr ( open )
- JDK 1.8 ( installation steps )
- Maven 3.6.3 ( installation steps )
- Tomcat -Embedded
- Eclipse IDE 2020-06 ( Download )
We hope the above software dependencies are already available in your system if not follow the specified installation steps to set up your spring boot application environment.
Hello World Example using spring boot initializr
Creating a spring boot hello world example is very simple using spring initializr. You just need to follow the below steps:
Step-1. Open Spring Initializr URL: https://start.spring.io/
Step-2. Provide the below details as shown in the image:
Group : com.javacodepoint
Artifact: HelloWorldExample
Package : com.javacodepoint.example
Dependencies: choose only Spring Web
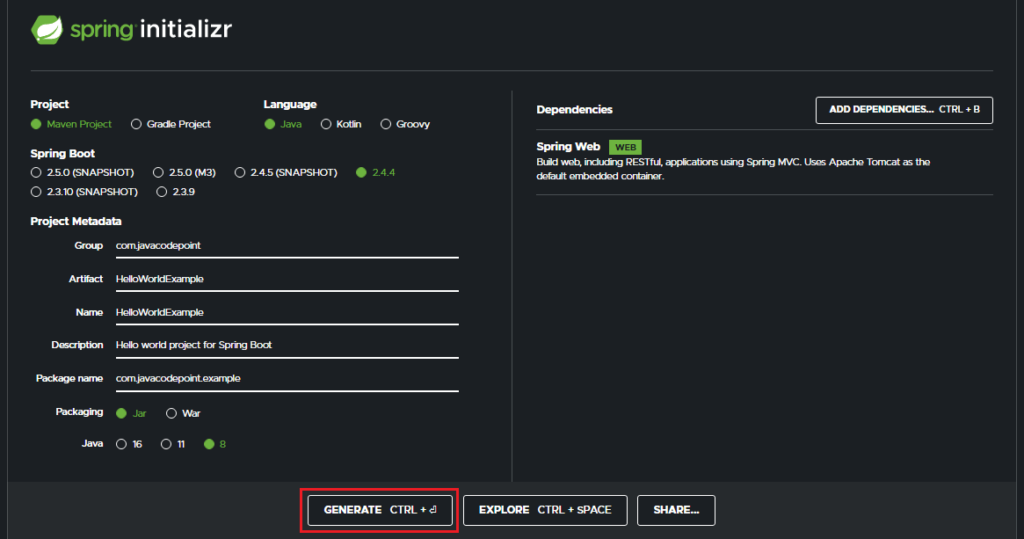
Now click on GENERATE button to download the zip file of the project.
Step-3. Extract the downloaded zip file into a folder.
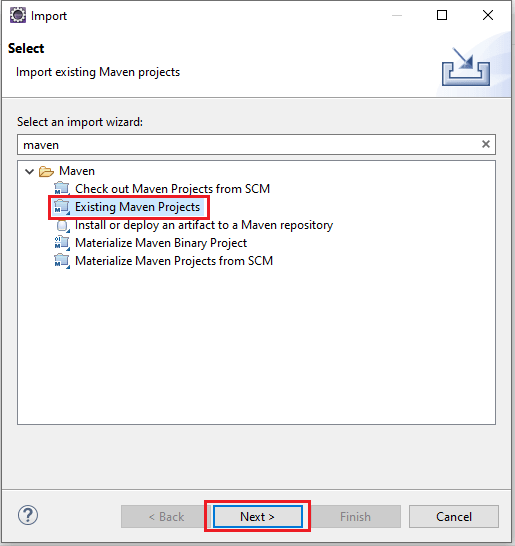
Step-4. Open Eclipse IDE and click on File menu > Import then you will see the below dialog. Here just type maven and choose Existing Maven Projects and click on the Next button.
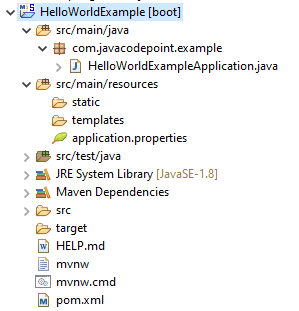
Step-5. Now browse the extracted folder and click on Finish. Once you click on the Finish button you can able to see the below project structure got created in your eclipse.
pom.xml
<?xml version="1.0" encoding="UTF-8"?>
<project xmlns="http://maven.apache.org/POM/4.0.0" xmlns:xsi="http://www.w3.org/2001/XMLSchema-instance"
	xsi:schemaLocation="http://maven.apache.org/POM/4.0.0 https://maven.apache.org/xsd/maven-4.0.0.xsd">
	<modelVersion>4.0.0</modelVersion>
	<parent>
		<groupId>org.springframework.boot</groupId>
		<artifactId>spring-boot-starter-parent</artifactId>
		<version>2.4.4</version>
		<relativePath/> <!-- lookup parent from repository -->
	</parent>
	<groupId>com.javacodepoint</groupId>
	<artifactId>HelloWorldExample</artifactId>
	<version>0.0.1-SNAPSHOT</version>
	<name>HelloWorldExample</name>
	<description>Hello world project for Spring Boot</description>
	<properties>
		<java.version>1.8</java.version>
	</properties>
	<dependencies>
		<dependency>
			<groupId>org.springframework.boot</groupId>
			<artifactId>spring-boot-starter-web</artifactId>
		</dependency>

		<dependency>
			<groupId>org.springframework.boot</groupId>
			<artifactId>spring-boot-starter-test</artifactId>
			<scope>test</scope>
		</dependency>
	</dependencies>

	<build>
		<plugins>
			<plugin>
				<groupId>org.springframework.boot</groupId>
				<artifactId>spring-boot-maven-plugin</artifactId>
			</plugin>
		</plugins>
	</build>

</project>
HelloWorldExampleApplication.java
package com.javacodepoint.example;

import org.springframework.boot.SpringApplication;
import org.springframework.boot.autoconfigure.SpringBootApplication;

@SpringBootApplication
public class HelloWorldExampleApplication {

	public static void main(String[] args) {
		SpringApplication.run(HelloWorldExampleApplication.class, args);
	}

}
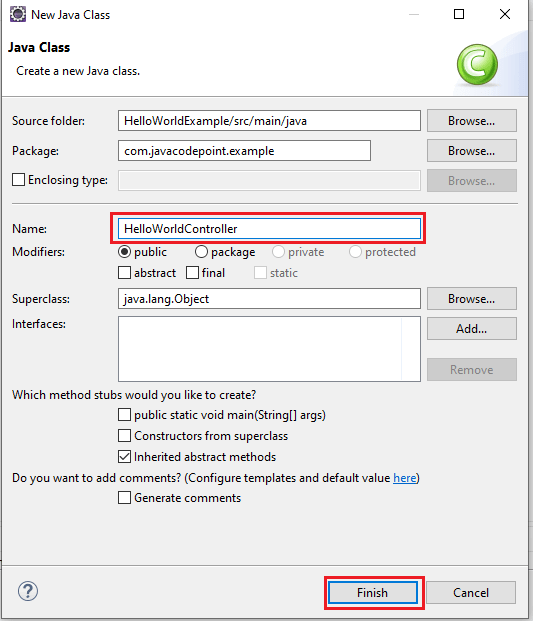
Step-6. Create a new HelloWorldController class by Right click on com.javacodepoint.example package > New > Class and type the class name and click on the Finish button as below image:
Step-7. Now copy the below code and paste it into the HelloWorldController.java file.
package com.javacodepoint.example;

import org.springframework.web.bind.annotation.RequestMapping;
import org.springframework.web.bind.annotation.RestController;

/**
 *
 * @author javacodepoint
 *
 */
@RestController
public class HelloWorldController {
	@RequestMapping("/")
	public String hello() {
		return "Hello World!";
	}
}
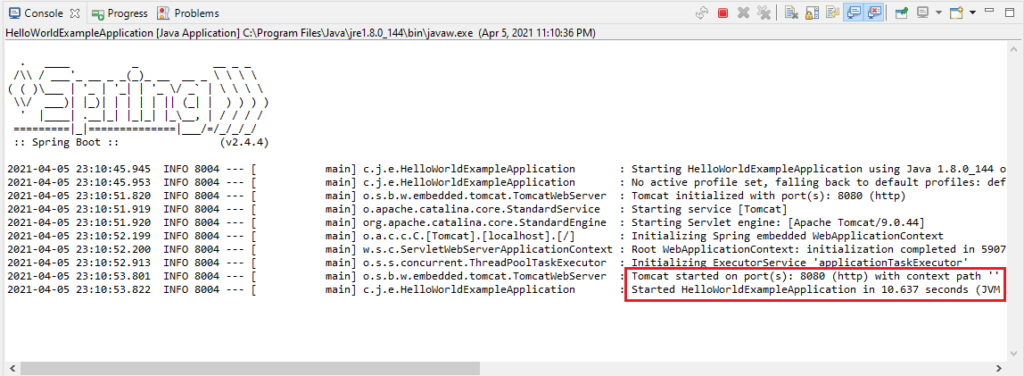
Step-8. Now Run the created application. Right-click on HelloWorldExampleApplication.java > Run As > Java Application then it will start the server as you can see the below image Started HelloWorldExampleApplication in 10.637 seconds.
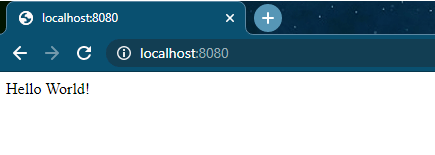
Step-9. Test the application by accessing the URL: localhost:8080/ in any browser as below image:
That’s all. You have successfully created and executed a Hello World Spring boot application using spring boot initializr.
Conclusion
In this article, you have seen the Hello world example application using spring initializr. You have also seen how to import created maven application in Eclipse IDE and execute it.
Hope you like it!
Related Articles:
- Spring Boot Hello World Example using STS
- Creating a Spring Boot Project with Eclipse and Maven
- Spring Boot File Upload with Advance Progress bar in Ajax
You may also like:
- Apache POI – Read and Write Excel files in java
- How to create password-protected Excel in java?
- How to Read password-protected Excel in java?
- How to write data to an existing Excel file in java?
- [Java code] Convert Excel file to CSV with Apache POI
